> ## Documentation Index
> Fetch the complete documentation index at: https://docs.paysight.io/llms.txt
> Use this file to discover all available pages before exploring further.
# Connecting your store
> Learn how to connect your shopify store to Paysight.
 This guide covers the quickest way to get your Shopify store connected to paysight, if you are looking for checkout customisation, please visit [Checkout Editor](/guides/shopify-store-editor) documentation
## Before you start
Have these details ready before you begin:
You need the Shopify store URL and the four-digit Shopify collaborator request code.
You need access to the DNS provider for the checkout domain or someone who can add DNS records.
Prepare the customer-facing store name, website, logo, color, and support contact details.
Confirm subscription, product, payment profile, shipping, card, wallet, and 3DS requirements.
If the store charges shipping, create a dedicated unlisted Shopify product for shipping and sync it back to Paysight before configuring checkout shipping.
## How boarding works
Onboarding shopify store to paysight involves a little bit of back and forth because some of the process cannot be automated. We have automated as much as we could but you will have to wait for you account manager to handle certain steps for you.
This guide covers the quickest way to get your Shopify store connected to paysight, if you are looking for checkout customisation, please visit [Checkout Editor](/guides/shopify-store-editor) documentation
## Before you start
Have these details ready before you begin:
You need the Shopify store URL and the four-digit Shopify collaborator request code.
You need access to the DNS provider for the checkout domain or someone who can add DNS records.
Prepare the customer-facing store name, website, logo, color, and support contact details.
Confirm subscription, product, payment profile, shipping, card, wallet, and 3DS requirements.
If the store charges shipping, create a dedicated unlisted Shopify product for shipping and sync it back to Paysight before configuring checkout shipping.
## How boarding works
Onboarding shopify store to paysight involves a little bit of back and forth because some of the process cannot be automated. We have automated as much as we could but you will have to wait for you account manager to handle certain steps for you.
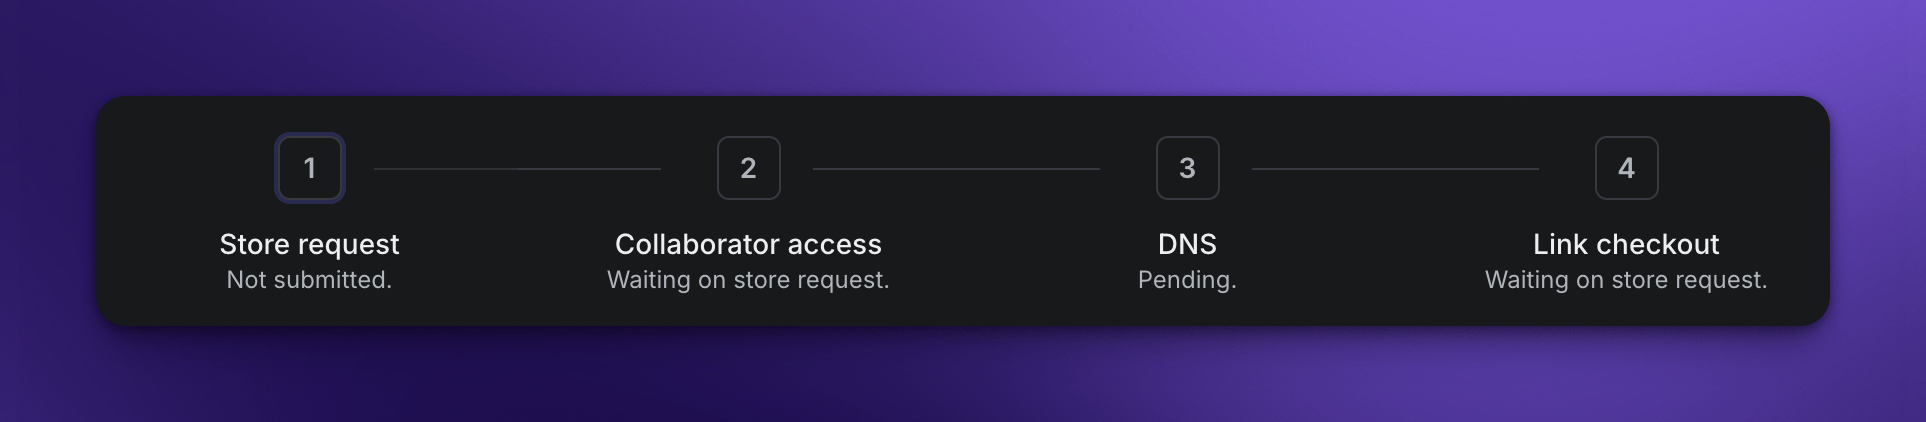 **The onboarding wizard will inform you when you are waiting for paysight to handle a step.**
* Paysight will confirm when collaborator request is accepted
* Paysight will confirm when Paysight Shopify App is installed
* Paysight will confirm when DNS & SSL is connected.
* Paysight will confirm when shopify store is full connected.
Onboarding is resumable. If a step depends on Paysight review, DNS propagation, or Shopify access, return to the Onboarding tab later and select the store to continue.
## Start onboarding
In Paysight, go to **Shopify Stores** and select **Add store**.
If you already started onboarding, open the **Onboarding** tab and resume the pending store instead.
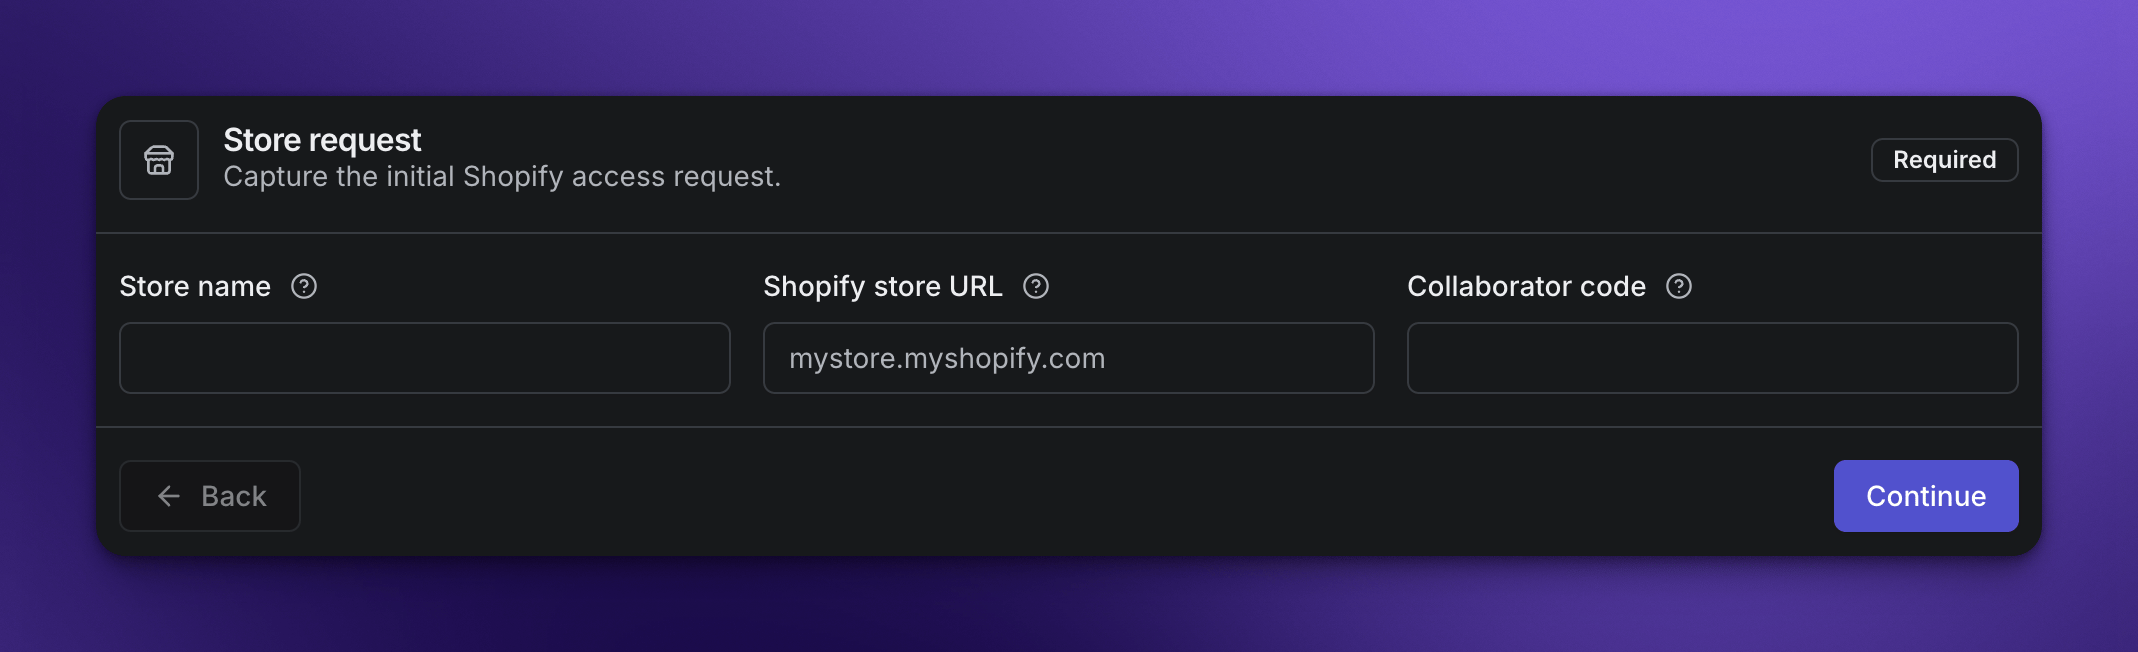
Enter the store name, Shopify store URL, and Shopify collaborator code.
Paysight uses this information to request collaborator access and prepare the store record.
**The onboarding wizard will inform you when you are waiting for paysight to handle a step.**
* Paysight will confirm when collaborator request is accepted
* Paysight will confirm when Paysight Shopify App is installed
* Paysight will confirm when DNS & SSL is connected.
* Paysight will confirm when shopify store is full connected.
Onboarding is resumable. If a step depends on Paysight review, DNS propagation, or Shopify access, return to the Onboarding tab later and select the store to continue.
## Start onboarding
In Paysight, go to **Shopify Stores** and select **Add store**.
If you already started onboarding, open the **Onboarding** tab and resume the pending store instead.
Enter the store name, Shopify store URL, and Shopify collaborator code.
Paysight uses this information to request collaborator access and prepare the store record.
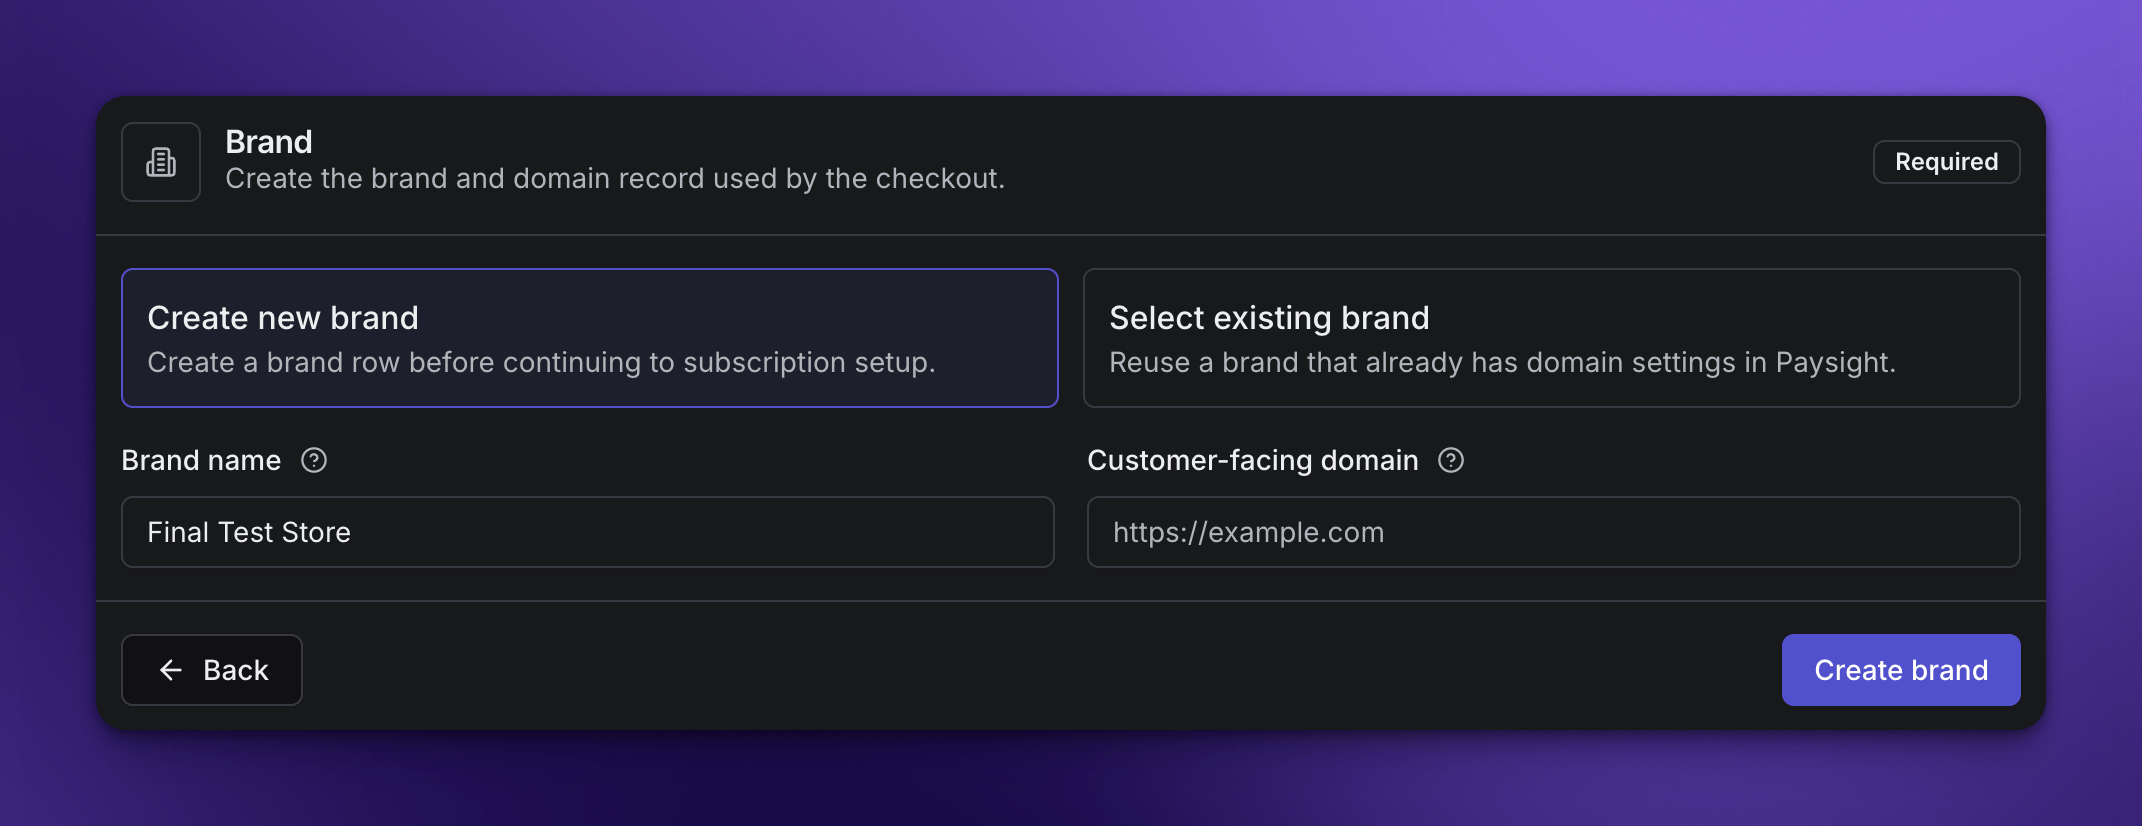
 Brand is a Paysight item used to link stores, mids, companies together. \
You can either create a new brand by entering a Brand name and customer facing domain (your store link) or use an existing on if you've already setup a brand.\\
Brand is a Paysight item used to link stores, mids, companies together. \
You can either create a new brand by entering a Brand name and customer facing domain (your store link) or use an existing on if you've already setup a brand.\\
 Decide on a subdomain that you want to use for your checkout, for example **checkout.**\
Customers will land on **checkout.yourstore.com** when they go to checkout via paysight.\\
Decide on a subdomain that you want to use for your checkout, for example **checkout.**\
Customers will land on **checkout.yourstore.com** when they go to checkout via paysight.\\
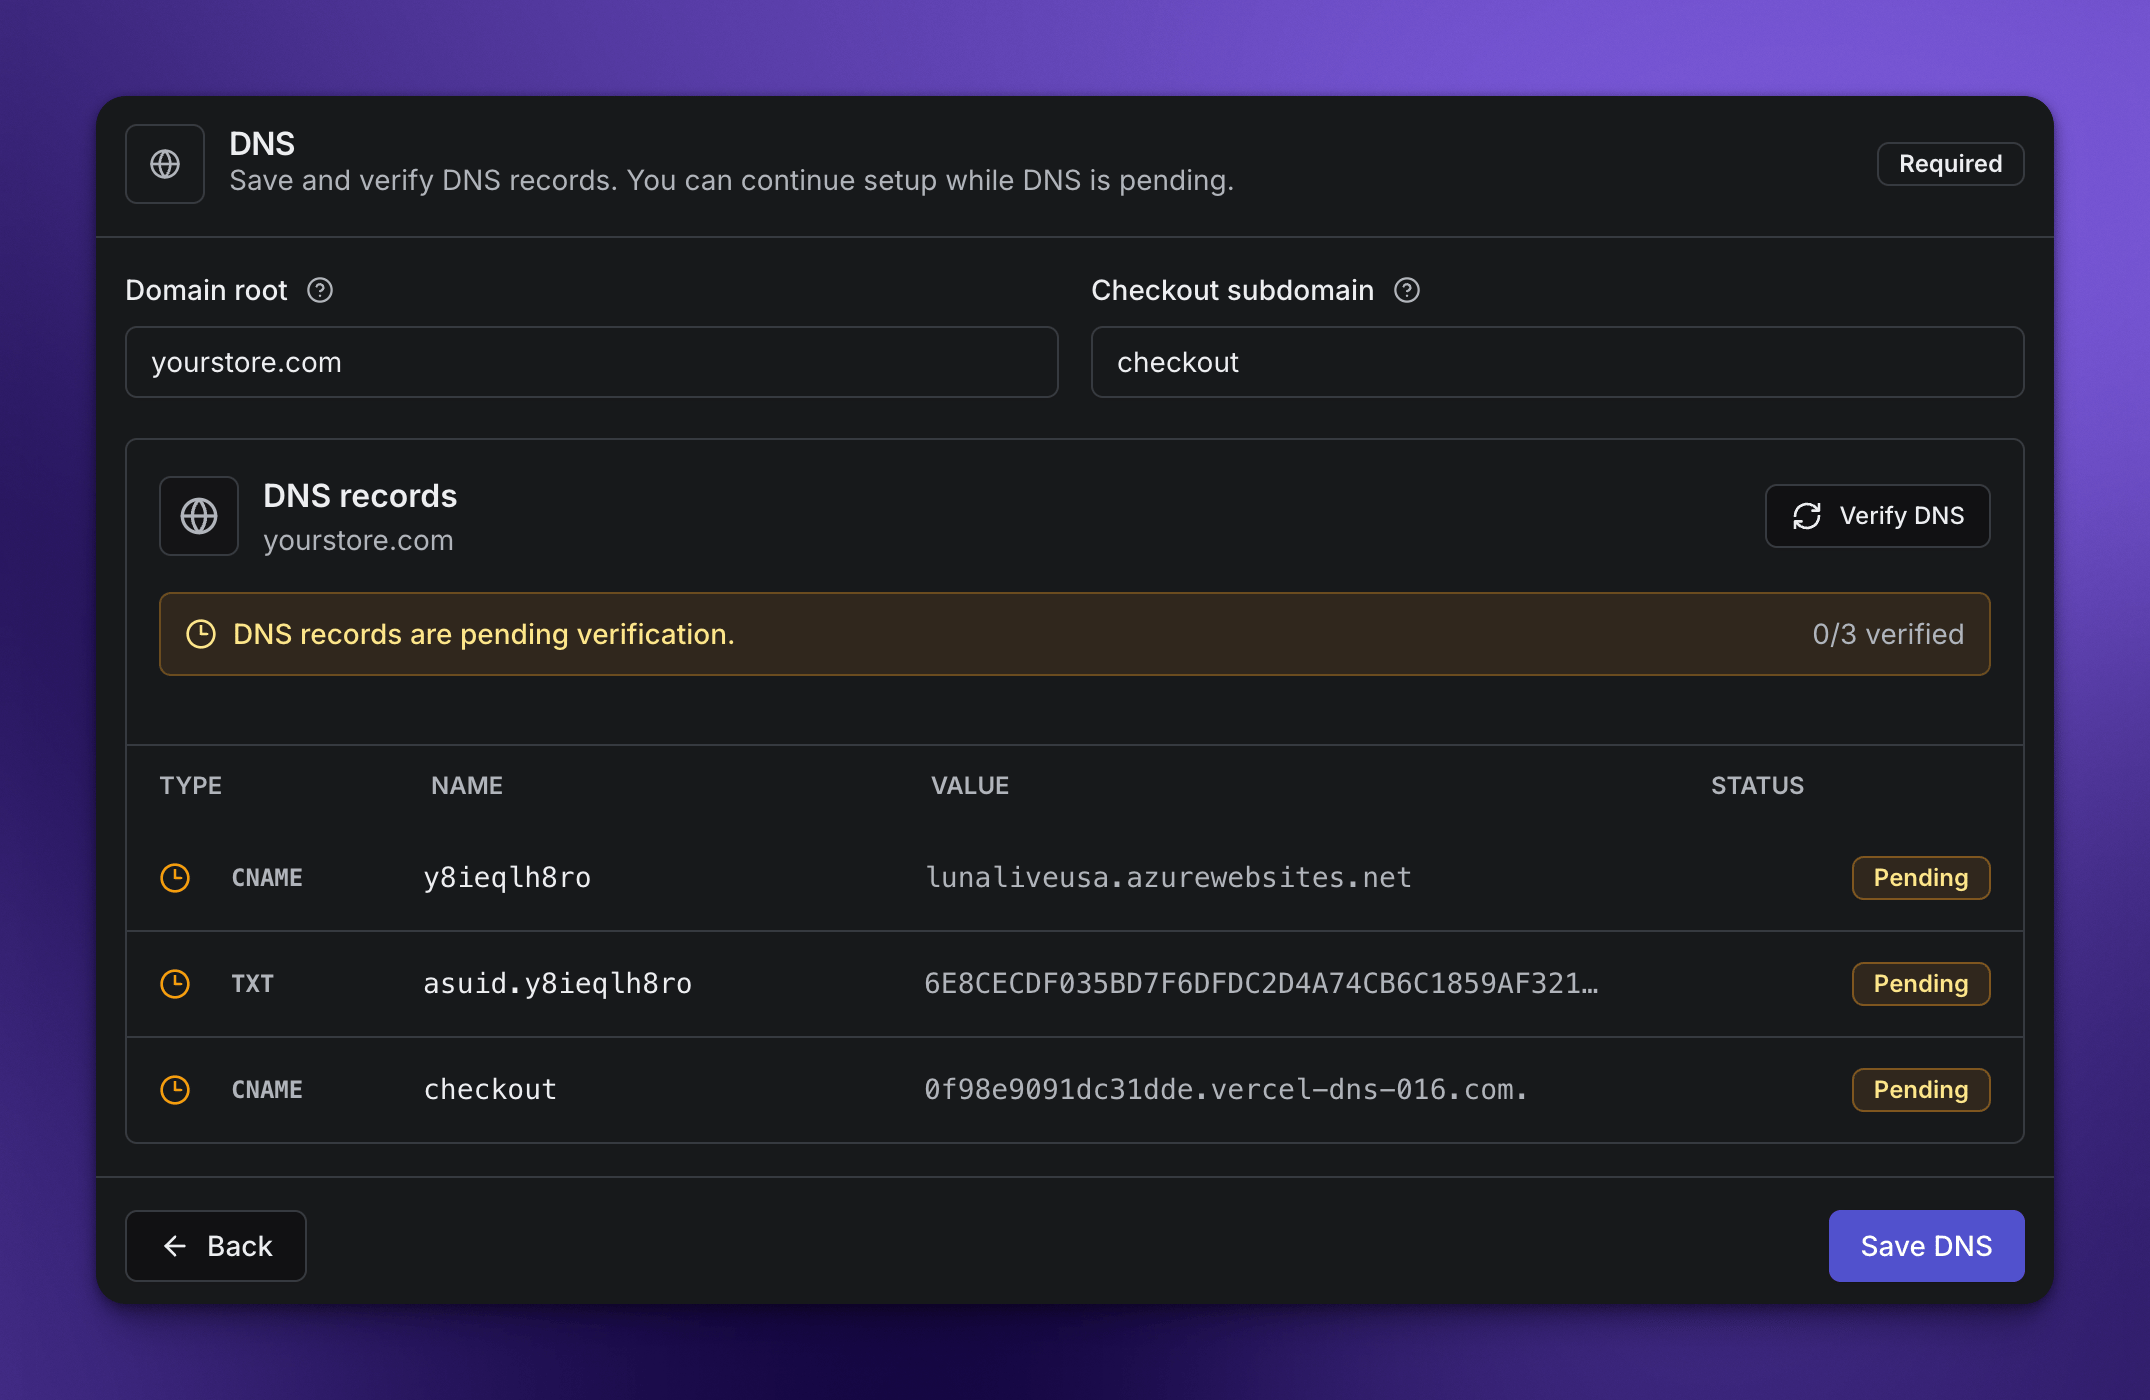 \
Enter the checkout subdomain and root domain, then add the DNS records shown in Paysight.
DNS verification may take time. You can continue other setup work while records propagate. Final DNS verification will be completed by paysight.
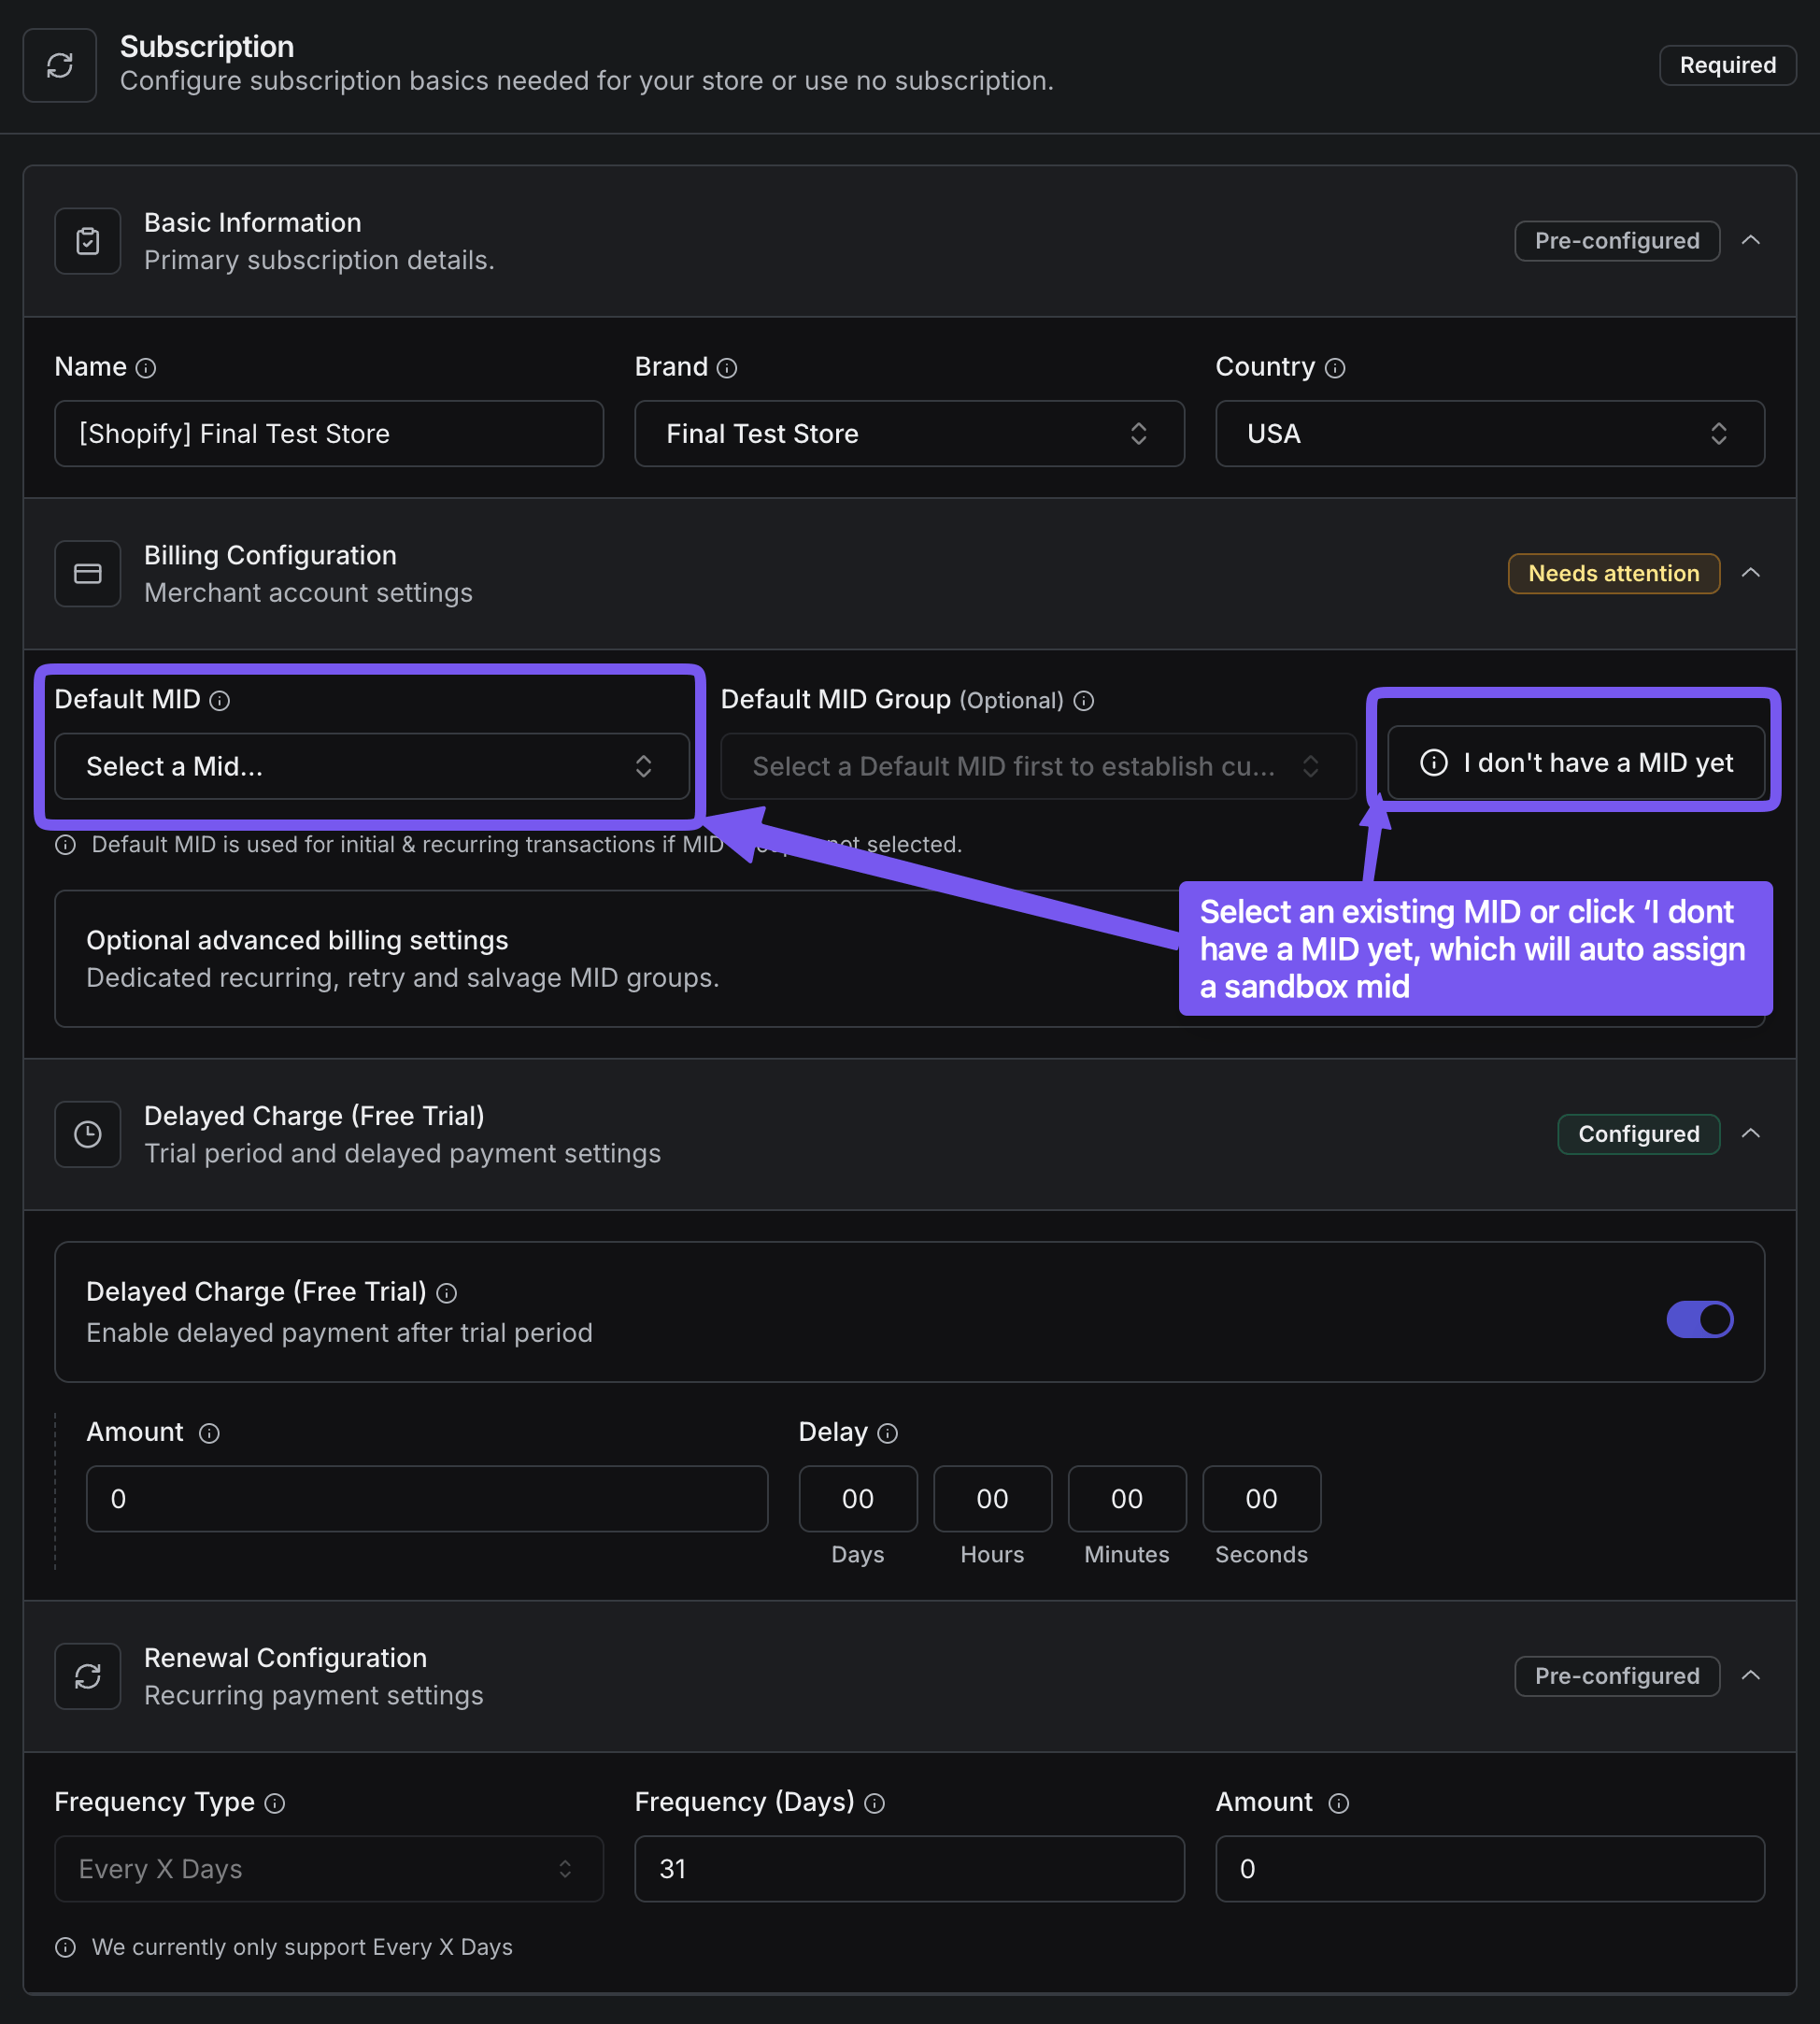
Choose a subscription setup or use a no-subscription configuration, then create the product payment profile for the store.
This ties checkout submissions to the correct Paysight product and payment routing.
You will be asked to connect a **Merchant Account (MID)** to the subscription and Product (payment profile), if you do not have a mid, click on '**I don't have a MID yet**' which will generate and assign a sandbox merchant account, this can be changed later.
\
Enter the checkout subdomain and root domain, then add the DNS records shown in Paysight.
DNS verification may take time. You can continue other setup work while records propagate. Final DNS verification will be completed by paysight.
Choose a subscription setup or use a no-subscription configuration, then create the product payment profile for the store.
This ties checkout submissions to the correct Paysight product and payment routing.
You will be asked to connect a **Merchant Account (MID)** to the subscription and Product (payment profile), if you do not have a mid, click on '**I don't have a MID yet**' which will generate and assign a sandbox merchant account, this can be changed later.
 Add the checkout logo, brand color, support email, support phone, support URL, default country, footer links, and checkout labels.
These settings control what customers see during checkout and after purchase.
Choose card checkout behavior, supported card brands, express wallet defaults, and 3DS options.
Leave uncertain payment settings unchanged and confirm requirements with your Paysight account manager.
This step can only be completed when collaborator access is confirmed, Shopify app has been installed, DNS is verified and SSL has been created.
You can follow the guide to link the checkout yourself or request assistance on this step.
## Onboarding statuses
Complete any available step shown in the onboarding flow. Optional checkout settings can be skipped and edited later in the Checkout Editor.
DNS records must be saved in your domain provider and verified before checkout can be linked. Propagation can take time depending on the DNS provider.
Paysight may need collaborator access approved, a Shopify app installed, or checkout script setup before the final Shopify link can be confirmed.
## What each step changes
Captures the store name, Shopify URL, and collaborator code so Paysight can prepare access and create the onboarding record.
Creates the brand and domain record used by the checkout. This is the identity customers see on the checkout page.
Saves the checkout domain and DNS records, then verifies the records needed to serve checkout securely.
Configures the subscription model used by checkout, or a no-subscription path when the store does not sell subscriptions.
Creates and associates the Paysight product/payment profile used for checkout submissions.
Sets optional customer-facing logo, color, support email, support phone, support URL, and website details.
Sets checkout copy such as pay button text, contact/delivery/payment labels, default country, and footer links.
Sets optional card, wallet, supported-card, and 3DS defaults for the store.
Confirms the Shopify side is ready, verifies checkout routing, and completes onboarding.
Once onboarding is complete, open the active store from **Shopify Stores** and select **Edit Checkout** to manage checkout settings in the [Shopify Checkout Editor](/guides/shopify-store-editor).
If your store uses shipping, you must first create an unlisted product on your shopify store.\
You can call it anything, eg. Standard Shipping, and set the price to 0.\
\
Then simply re-sync your shopify products back to paysight in the Checkout Editor and use this product as shipping identifier for your dynamic paysight shipping options.
## Troubleshooting
Required previous steps must be completed before later steps unlock. Some steps also depend on DNS verification or Shopify access being accepted.
Confirm the DNS records match exactly, then wait for propagation. If the records are correct but still not verified, contact your Paysight account manager.
Confirm the checkout script is installed in the active Shopify theme and that Paysight has confirmed the Shopify link step. In rare cases of script not functioning properly due to theme issues, please open a support ticket or reach out to your account manager.
Complete onboarding first, then update those settings from the Checkout Editor for the active store.
Add the checkout logo, brand color, support email, support phone, support URL, default country, footer links, and checkout labels.
These settings control what customers see during checkout and after purchase.
Choose card checkout behavior, supported card brands, express wallet defaults, and 3DS options.
Leave uncertain payment settings unchanged and confirm requirements with your Paysight account manager.
This step can only be completed when collaborator access is confirmed, Shopify app has been installed, DNS is verified and SSL has been created.
You can follow the guide to link the checkout yourself or request assistance on this step.
## Onboarding statuses
Complete any available step shown in the onboarding flow. Optional checkout settings can be skipped and edited later in the Checkout Editor.
DNS records must be saved in your domain provider and verified before checkout can be linked. Propagation can take time depending on the DNS provider.
Paysight may need collaborator access approved, a Shopify app installed, or checkout script setup before the final Shopify link can be confirmed.
## What each step changes
Captures the store name, Shopify URL, and collaborator code so Paysight can prepare access and create the onboarding record.
Creates the brand and domain record used by the checkout. This is the identity customers see on the checkout page.
Saves the checkout domain and DNS records, then verifies the records needed to serve checkout securely.
Configures the subscription model used by checkout, or a no-subscription path when the store does not sell subscriptions.
Creates and associates the Paysight product/payment profile used for checkout submissions.
Sets optional customer-facing logo, color, support email, support phone, support URL, and website details.
Sets checkout copy such as pay button text, contact/delivery/payment labels, default country, and footer links.
Sets optional card, wallet, supported-card, and 3DS defaults for the store.
Confirms the Shopify side is ready, verifies checkout routing, and completes onboarding.
Once onboarding is complete, open the active store from **Shopify Stores** and select **Edit Checkout** to manage checkout settings in the [Shopify Checkout Editor](/guides/shopify-store-editor).
If your store uses shipping, you must first create an unlisted product on your shopify store.\
You can call it anything, eg. Standard Shipping, and set the price to 0.\
\
Then simply re-sync your shopify products back to paysight in the Checkout Editor and use this product as shipping identifier for your dynamic paysight shipping options.
## Troubleshooting
Required previous steps must be completed before later steps unlock. Some steps also depend on DNS verification or Shopify access being accepted.
Confirm the DNS records match exactly, then wait for propagation. If the records are correct but still not verified, contact your Paysight account manager.
Confirm the checkout script is installed in the active Shopify theme and that Paysight has confirmed the Shopify link step. In rare cases of script not functioning properly due to theme issues, please open a support ticket or reach out to your account manager.
Complete onboarding first, then update those settings from the Checkout Editor for the active store.